Making the Clothes
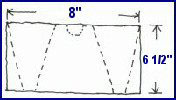
Arrange the cut pieces as shown and glue together along the pink areas.
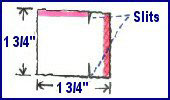
- Sleeves
Cut 2 x 1 3/4" square pieces for the sleeves.
Glue on pink area, make a tube, then slide over arm. Secure on the shoulder. Glue on blue areas of the dress, drape over the body and press into position. Let it dry.
- Building the arms
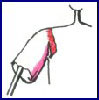
Making the hat
Hand tear a 3" diameter circle. Glue it to the top 1/3 of head.

- Making the hat

Drape down the rim and shape it.
Cut an 8" x 1" strip for the hat band. Crumble it between your palms, then straighten it out. Tie around the hat and secure with glue.

- Hat ribbon
Watering Can
Use a 2" styrofoam ball and trim it to a shape you like. Cover it with coloured Washi paper. As an alternative, you could use plastic caps or little medicine measuring cups and cover them with paper instead. Use a Washi paper covered wire for the handle and pieces of chop sticks for the spout and cover them with Washi paper.
A Finished Example
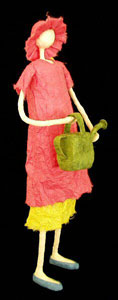
- Finished example
Please visit my website at falkenart.net