This is how the base of the pedestal should now look. Now it is time to start using your paste and paper strips to start building this up. All of the base will need to be covered in stages. The trick is not to rush this, allowing each layer to dry thoroughly before applying another. Many layers will be required before you can move on to covering it with your pulp mixture. I personally always do a few layers of pulp mixture for added strength. The pedestal base, when finished and completely dry, should be able to easily take your weight.
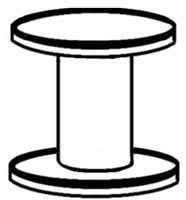
- Basic pedestal base
While the pedestal is drying, you could start the backrest of the throne/chair. In the diagram, I have used a sketch with my own design. You may wish to use one of your own.
Cut out 3 - 4 identical backrests and stick them together as you did the circles earlier. Leave to dry.
Tip: The lower the backrest the fewer cardboard cut outs you will need and the easier it will be to finally attach to the base.
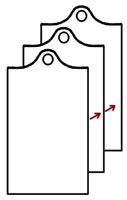
- Constructing the backrest
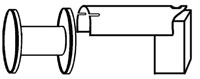
When the backrest is dry, cut two slits into the base as shown. This will help the cardboard curve when attaching it to the round base. If you attempt to cut these slits when the cardboard is still damp with adhesive, it may damage the integrity of the bottom of it, causing curving and creasing.
Tip: If you have chosen to perhaps make a square shape, instead of round, these slits are unnecessary and the back will be easier to attach.
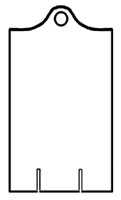
- Curving the backrest
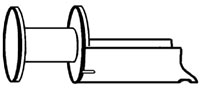
When base and backrest are ready, you can start to attach them together. It is possible to do it in a vertical fashion but is by far simpler to lay it down.
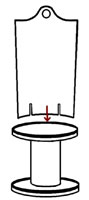
- Attaching the backrest
This is the trickiest part. As in the diagram, turn the base over and wedge it to stop it rolling away. Now, using a box for support, rest the head of the backrest on it and place the bottom part on the base. You will need to use more of the strong adhesive tape to help secure and curve it around the base. As the base is already toughened with layers of dry pulp, a staple gun can be used to help attach it. Once satisfied, start to build up paper strips with paste from underneath the seat and up to the top of the head rest. Allow each layer to dry thoroughly. This is going to take time and patience as it will take many, many layers. Eventually you can apply a few layers of pulp mixture which will give it much more strength.
- Securing the join
When all the layers of paper, paste and pulp have dried rock hard, it is time to turn it over as shown and start working on the front side. Do this in exactly the same way you worked on the back. Once again, I’d suggest you wedge something under the base to stop it rolling off.
- Securing the join