All papier-mâché'd, with the ears installed and a new tail-tuft, along with little tufts on the horns.
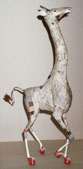
- All papier-mached!
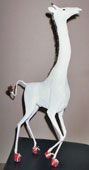
- Complete with mane
Here he is with the mane and the undercoat of white paint. Be careful not to get paint on the mane.
A few notes on the details
Eyes
I didn't want to paint the eyes on this guy, so I made my own eyeballs for him. I carved a hemispheric depression in a block of wax (soap might work also) and poured in clear epoxy. For the irises, I painted small flat washers and submerged them into the wet epoxy. When it set, I turned them over and cast the other side, making (crudely) round eyeballs. I actually had them done before I found fake eyeballs available from taxidermy supply companies, cheap and good-looking.
Shoes
I made the shoes myself, because I didn't think I'd find any suitable elsewhere. They are one inch long, and the soles are of a textured cloth like seersucker. The uppers are poly-cotton from a shirt I was going to throw out. I treated all the cloth with a thin layer of silicone adhesive (on the inside) to prevent it from unraveling, and the parts are glued together with the same stuff. The uppers consist of only two pieces, and have working laces made of kitchen string. Eyelet holes were done with a leather punch, and the shoes were painted prior to installing the laces. Be aware that paint does not want to stick to the silicone adhesive.
Mane
The mane is made from feathers, courtesy of my pet bird. After separating the feathers right and left (you want them all to curve the same direction), I stripped the veins and cut uniform pieces from them until I had enough for the length of the mane, plus some extra. I carefully trimmed the ends and glued the spines onto the center of a thin piece of cloth with silicone. Very tedious work. I sprayed clear matte varnish on to prevent them being ruined by the final paint job. Then I trimmed this whole thing to length and papier-mâché'd it in place. The final paint on the feathers is diluted.
Tail tuft
The tail tuft is made of sewing thread, double-saturated with acrylic artist color to give it stiffness. This was then wound in close turns around a dowel rod. I cut a narrow strip of masking tape, painted it to match, and laid it lengthwise across the turns and cut along one side of it to release it from the dowel. Then, to simulate hair of differing lengths, I cut some notches along the length of this assembly. Think of pinking shears, but on a much larger scale. Finally, I wrapped this in a tight spiral around the end of the tail wire.
When I began the project, I was concerned about the texture of papier-mâché. My only previous experience with this medium was in grade school, and I recalled it being lumpy. Practicing on scrap, I found that enough force and finesse would get most of the lumpiness out, but I was still worried that it would show up in a strong light. To solve this, I got a package of sand at a craft store. This is the very fine stuff that comes in colours, so you can do sand paintings with it. I got the nearest I could to white, brushed a coat of paste on the sculpture (avoiding the eyes and mouth), and sprinkled the sand liberally on. This breaks up the highlights at harsh edges. If you can still see a crease or corner, you can camouflage it with your paint job by locating the edge of a block of colour along the edge of the offending crease.
All done, and smiling for the camera
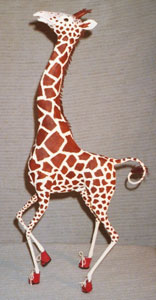
- Finished example
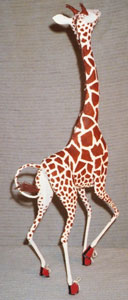
- Finished example
-