Decorating the dog
Note: When making up the wallpaper paste, always add paste to water, never the other way around. Otherwise you end up with a nasty unworkable lump.
Half fill the cereal bowl with cold water and sprinkle on a little of the wallpaper paste and mix with your brush. You’ll soon get used to how much to use. Make it a consistency that’s not too runny or so thick you can’t stir it easily.
I’m assuming you’re decorating with paper as I do, but if you want to paint, then cover the dog with two or three layers of small pieces of newspaper pasted on with wallpaper paste. Allow to dry before painting. If you paint on wet or damp papier mache it will rot, smell and spoil.
I’ve used rice paper to cover my dog but you could use sugar paper (known as construction paper in the USA), tissue or packing paper. If you can get an end of roll of plain white newsprint from your local newspaper printers that’s good too.
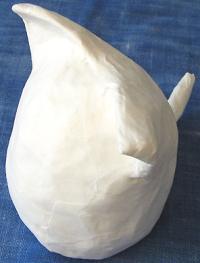
Tear up plenty of pieces of paper (not too big) and several small bits for going round ears and tails (fig. 1).
Paste 3 or 4 layers of thin strips onto the base first and then paste strips that start on the base and come up on to the lower, wider part of the cone. You can leave it for a day to dry at this stage, but go over the part you’ve papier machéd with your fingers and thumbs, spending a few moments smoothing and blending it all in. This will improve the appearance and give a good finish. You must repeat this step each time you stop work.
- Fig. 4
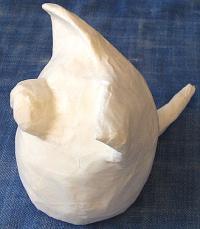
Cover the whole animal in 2 or 3 layers of paper. You can put more on if you like, but that will be enough. Smooth well all over and leave to dry.
Putting the muzzle on
Using small bits of paper (I used thick white Saa paper), paste them all on top of each other until you get a long nose, then leave to dry. When dry, paste tiny bits on and tidy it up so it has a good smooth shape (have a look at finished dog). Check the muzzle is long enough to suit the face, is the right shape and is neat enough. If you haven’t got any thick paper you can scrunch up some white tissue or other paper. Wet it with paste, shape it and stick it on (remember to make it fairly high up). Next, secure it with some tiny strips of white paper on to the face. Leave it to dry then paste on some more strips, to secure and neaten. Smooth it all down.
Making the nose
To add the nose, just paste small bits of black paper onto the end of the muzzle and keep shaping it. Make it small and cute or big and funny (fig. 5).
- Fig. 5
Making the mouth
I haven’t given this dog a mouth because there’s enough expression in the eyes and the shape of the muzzle, but you can do a happy dog and give him a smiling mouth. To do that, pull a black fibre from mulberry tissue or a tiny strip of black paper and roll it between your fingers until you get a long black line, and paste it on beneath the nose. I sometimes paste the corners down with a tiny bit of white tissue paper to hold it in place, or you could just paint a line with a fine brush and black acrylic paint.
Making the eyes
Here I used black half bead eyes and stuck them in place by pasting tiny strips of paper around the edges of the eyes, building up an eyelid and the shape of the eye. I gave the eyes a slightly sad look.
Simple button eyes
You can do very attractive, simple black eyes by scrunching up 2 tiny balls of black paper. Flatten and shape them into little buttons, wet thoroughly with paste and just stick them on. They’ll be quite secure, or you can make a button of white paper. Position them and hold in place with tiny strips of paper as I did with my half bead eyes, and when they are quite dry you can paint them with black acrylic paint. Don’t use water colour as it will run when you varnish. Alternatively you could just paint on 2 button eyes with black acrylic paint.
Coloured patches
I used scraps of Nepalese Cloud paper to put colour on my dog, but you can use sugar paper, scraps of paper from comics or the Sunday supplements. Use soft matte paper, not hard glossy paper and paste them on, smooth them down and leave to dry.
Check the dog for any extra smoothing out needed and leave to dry if you do more work on it.
Now give your dog a name and sign your name and the date on the bottom of the dog in waterproof ink.
Give the dog a coat of varnish. You can use diluted PVA glue, but I prefer to use a satin water based non toxic household interior varnish that I get from a big hardware superstore. Apply the varnish thinly or it will yellow and spoil the look of your dog.
Finished example
Here's my dog. I call him Cloud.
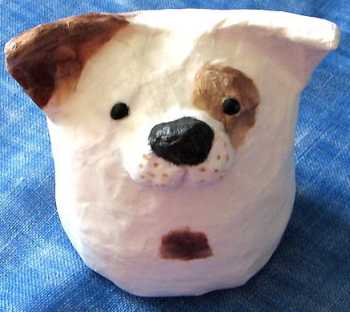
- Finished Example
- Pat Little