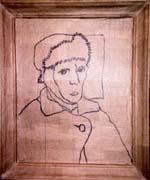
- Drawing the design
Draw your image/idea on the dry Papier Mache.
Use pencil or felt tip marker.
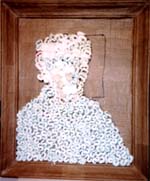
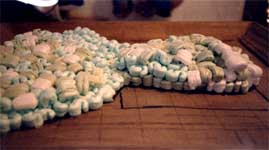
- Giving the drawing depth with styrofoam
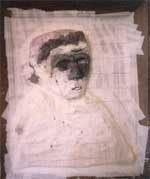
- Covering raised image with cloth
Cover raised image with plaster cloth.
You could try the Papier Mache strips but mine would not adhere. Masking tape would most likely work also.
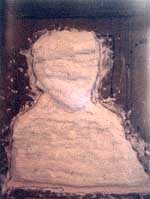
Cover plaster taped image with 6 to 7 layers of Papier Mache strips. When the last layer is dry you are ready to add the features with the Celluclay. Mix Celluclay in either a plastic bag or a plastic bowl. Add 4 cups of water to 1 pound of dry celluclay. Knead until it becomes a firm clay with no dry spots. I do mine in a large zip lock bag as it is less messy. (It will keep for eons in the refrigerator). Using your original drawing and references add the features by building up the celluclay. Use inexpensive plastic or wooden modeling tools or found objects such as toothpicks, craft knife, metal nail file, paint brush handle etc. Whatever works. Keep a small bowl of water handy to help smooth out the 'clay'.
- Covering raised image with papier mache
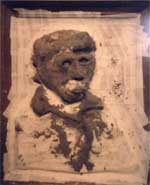
- Adding features
Continue adding features with the celluclay. Notice in this photo how his collar is raised and his eyes, lips and nose are taking shape. His eyes were rather tricky. After making the socket for each eye, form a small 'eye' ball with the celluclay and insert it into the socket. Flatten out another piece of celluclay for the lid and place it over the top part of the eye ball to form an eyelid. Smooth the lid up toward the brow. Celluclay starts to "set up" in about 30 minutes at which time fine modeling and smoothing of the surface with a dampened finger or dampened tool is possible. Once dry it can be sanded. Total drying time will take anywhere from a couple days to a week depending on the temperature, humudity and thickness of the celluclay. Once again, do not dry in the oven, the foamboard and styrofoam peanuts will melt and create toxic fumes. One of the great things about celluclay or instant Papier Mache is that because it is a mixture of powdered paper pulp and glue as a binder it can be added to at any time.