You are not logged in.
Hello,
I am new to the world of PM and would appreciate some help and advice.
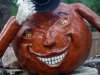
Basically I am making a large squashed ball shape (around 55cm diameter) to wear as a mask/helmet.
I would like it to look like this one
http://www.threadsmagazine.com/item/282 … anha-plant
I am going to use a semi deflated yoga ball to mould my PM around and first cover the ball with cling film.
As I am naive to the whole construction, best practice, practicality's; I have the following questions:
1. What type of PM should I use, how many layers will I need and what is the drying time of each layer?
2. I assume I should PM the whole ball in one go (per layer) to make sure there are no weaknesses, however I havent worked out how I'd do under the ball. Any advice?
3. Finishing. I have been told that I should plaster the ball afterwards to get a nice smooth finish. This seems like a massive undertaking, is it necessary? Are there alternatives to getting a nice finish that I can paint?
Thank you very much for all your help
Kind regards
G
Offline

Look on this site for advice on pastes etc. You are best to use layering. Kraft paper moulds well and is strong. I find the paper Amazon uses as packaging is excellent. Otherwise newspaper works OK but you will need more layers.
To get around the ball, I suggest you tie it with a few lines of string (four at 90 degrees from bottom to top should do; tie these together at the top and then hang the whole thing.
Do about three layers at a time to dry thoroughly. Twelve in total should be strong enough to be able to remove, cut, shape etc. Drying time depends entirely upon the ambient temperature and humidity. Normally overnight would be adequate.
The ball covered with clingfilm should be OK.
Layering will give quite a smooth finish, providing you apply the layers smoothly. Once finished and dried it can be sanded to the texture you seek.
Presumably you want a large open area (for face?). If so, do your first three layers over the whole ball but after that only the area you want for the final product.
Offline
Brilliant, thank you for your help. Now I just need to workout how to suspend a big inflatable ball covered in wet glue in my house without accidentally ruining a cat.
Thanks again
Offline
Ha ha
Offline
I don't think attempting to PM over a partly-inflated ball will work: Every time you touch it or move it, it's going to change shape.
Forget the cling film -- plastic is plastic, and not much sticks to it, and the extra layer will just complicate your problems.
The only way I can see to do this is to fully inflate the ball and PM with paper all over it. Don't try to do the entire ball in one go -- do half, let it dry enough so it doesn't peel off. One problem you'll discover as you go is that wet PM is heavy -- the part you have covered will keep trying to roll to the bottom. Sit the vinyl ball in a large bowl or tub (etc) to keep it from rolling around.
Do the top half in one or two layers, and then aim a fan at it if you can, to dry it. Then rotate the ball so the covered side is down and do the other half. Don't cover the valve thing, leave a 15 cm (+-) opening so you can remove the ball later.
David is right, use the stronger kraft paper, if possible, and two colors of it would be ideal (it comes in brown and white). It would take you forever with newspaper. Make each complete layer in a different color so you will be able to cover it evenly. Start with three layers of kraft paper and let it dry, then let a little of the air out of the ball and press on the PM to see if it's strong enough to hold its shape. If it flexes too much, and it may for something that large, add more layers until it's firm enough to suit you. You might have to re-inflate the ball if the paper shell is too floppy. BUT DON'T OVER-INFLATE or any weak joints may pull apart.
You always see people applying paper strips, but on round things, triangles often lie down more smoothly. Lay your paper on a table, hold a wooden or stiff metal ruler (or stick) on it, and tear into pieces. You'll have to experiment to find the best size -- if the triangles wrinkle too much, make them smaller (just tear them in half). Perfect triangles aren't necessary, just 3-sided pieces of paper. The smoother you apply the paper, the smoother it will be when you're finished.
Drying times will depend on how wet you get the paper and how humid your environment is. It needs to be wet enough to make the paper more flexible, but not too wet. Don't set the ball near high heat -- if the air in the ball heats up too much, it will expand. If the vinyl ball tries to expand too much, it may cause the paper layers to start pulling apart.
When you've got enough layers so you can handle it without it flexing too much, let the air out of the vinyl ball. Let it contract by itself, don't rush it. It should pull loose from the inside of your paper shell. Then reach in and gently loosen any part that is still sticking to the paper, and remove the ball.
Now get what we call a 'box knife' over here across the pond. One of these: http://www.harborfreight.com/utility-knife-3359.html ... oh, they call it a 'utility knife', too. Or a single-edged razor blade, or a very sharp knife.
What I think you'll want to do is cut a shape like an apple slice out of the ball, and let the opposite side flex like a hinge. I'm sure you'll want to make your cut-out to include the hole where the valve stem was (and it will be a handy place to grip). Mark it with a felt-tip pen first. Cut out less than you think you'll want. You can always cut more away to get it to look right, but cutting too much at once might end in a big 'OOPS'.
David suggested maybe 12 layers, and he may be right. But I would suggest fewer layers to start, so you can cut it easily. You want the original shell strong enough to handle and not flex too much while you cut; once you get it cut and shaped as you want it, you can add additional layers for strength and to hold the shape you want. Save the cut out piece for testing your paints on.
To brace the mouth open, I think you could use (temporary) wide strips of corrugated cardboard with slits cut at top and bottom to hold the 'lips' apart while you're adding more layers of PM. Cut the cardboard strips so the corrugations run up and down for strength. You might have to cut the slits at an angle to fit the 'lips' into them. Or use sticks if you've got them.
Leave them in place until the main piece is dry enough to hold itself rigid. Then finish the lips.
Smoothing carefully as you go will really reduce the amount of sanding you have to do. You should be able to smooth out the finish (before the paint) by brushing on acrylic emulsion paint with some chalk/whiting/calcium carbonate mixed in to make it thicker. Try it on the waste cut-out first, to make sure you're getting the effect you want, as you may have to make some adjustments as to amounts. Then you can paint on top of this.
Offline
I see that you are actually after a somewhat football shaped head. After you have removed and thoroughly dried your sphere, then you should shape it by cutting slits in the sides and retaping together in the football shape. After which another couple of layers of paper to cover the taping seams. Much easier to shape afterwards if your base is a perfect sphere. Trying to use a partially inflated ball is more tricky than a fully inflated ball as you 'flat' side moves as you rotate the ball for layers. Hanging a partially inflated ball will only give you a more teardrop shaped ball. I use the yoga balls a lot and they are not bad about expanding because of the thickness of the rubber used.
Offline
The Papier Mache Resource All content copyright © 2000 - 2026 the respective authors. Mentions in the media