The current status is that I am waiting for a little nice weekend weather to finish the cosmetics of the hull. Due to the sanding, this has to be done outside. Once I am happy with the hull, I can continue with the superstructure, and hopefully it will all be assembled, and running for lovely summer weekend mornings down by the local boating lake.
- Example plans
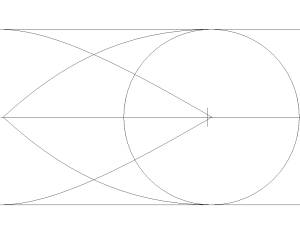
Drawing showing part of the plans, which I drew up on the PC. The point on the left is the plan for the bow, whilst the rounded part on the right is the pattern for the curve of the stern.
- Basic shell
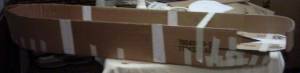
This is the basic cardboard shell being assembled.

- Forming the hull
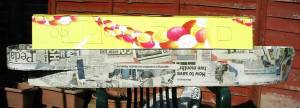
Papier mache layers are added to the outer hull.
- Taking shape
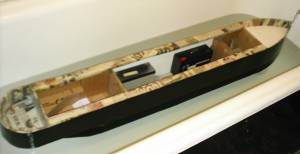
The cadbury's crème egg thing stuck on top of the hull, is the starting point for the superstructure. It, too, will be papier mached, and painted.
- Testing in water
I tested the boat in the bath, for centre of gravity, pitch, roll, waterproofing, and to see how deeply the boat sits in the water, and have come to the conclusion that I will be needing some weight in the boat. Using four lead acid batteries is enough to do the job, but I think that I might be better suited using a sheet of lead to lie in the bottom of the central compartment. It will also give the batteries something firm to sit upon (even though the bottom of the boat is very sturdy in its papier mache form).
My current goal (and a stage where I usually need a lot of patience and have to push myself to carry on) is in making the outer hull smooth enough to take a top coat. Ultimately, the hull will be as smooth as a car body panel. With wood, this is difficult, but with papier mache, it’s nearly impossible! It requires fine sanding, a bit of filling and reapplication of papier mache, and so on, many times over.
However, I’m about 80% there as far as outer hull preparation is concerned. Once this is complete, I can fit the internals and start the “pretty bits” superstructure, fine paint spraying, etc.
Update - 22nd May, 2005
I did a bit of work on the boat this weekend, between showers, and ended up deciding that the bow was a few millimetres out of true. Whilst cosmetically acceptable (you would need a very keen eye to spot it) it can have some strange results when the boat is on the water. With a long thin hull, such as the narrowboat, it causes the water to move faster on one side of the boat than the other and can affect steering, yaw (side to side movement) and so on, so I thought I’d try to get it back into true. It involved holding the boat upside down over a kettle, trying to steam the bow, to soften it so I could bend it a little. It seems to have worked, and now that that little drama is over, I can carry on with the surface preparation.
The next drama is going to be over some of the mechanics (the sort of thing to worry over whilst paint is drying, glue is setting, etc). I need to install the rudder at some point soon. The prop shaft and propeller are fitted, and seem fine, but the rudder is going to have to ‘dangle’ down at the back, and this puts a lot of strain on the mounting point. I’m desperately trying to avoid any use of wood, so I need to make the papier mache rock solid where the rudder is fitted. I’m sure I’ll sort it out somehow.
The boat's driving me mad, even though my twisted bow problem is sorted. Hopefully I'll leave the boat for a few weeks, and come back to it with some fresh ideas and renewed vigour. I've got rid of most of the wrinkles from the hull, so I'm quite pleased with it so far (even though it's taking a lot longer than I anticipated).
Update - 27th August, 2005
I must confess that I've not done a lot of boat building or sailing recently. The nature of my job is kinda spasmodic, and we have just finished silly season. Hopefully, I can now go back to a more peaceful existence and some boat building.
You might recall that the narrowboat had a bit of a problem with a twisted bow. It's easy to get this right with wood and metal, because you can cut them to fine tolerances. With cardboard, it's much more difficult because you have the thickness of the corrugated cardboard to worry about (you can't cut the cardboard thinner than the thickness of the card itself, if you see what I mean). I had to soak the inside of the bow to bend it, and steamed it to soften it whilst I used books and batteries (and a few ornaments) to put pressure on it whilst it dried. The good news is that it went really well, and the bow is as true as it is going to get. It's especially important to get it right on long boats with poor steering, as you cannot compensate for a twisted bow using the rudder. If you have a boat where the rudder is very effective, then a slight pull to the left or right can be compensated by setting the neutral rudder position slightly to the opposite side, so that it compensates. If the rudder is not very effective, then you have to turn it fully over to one side to take out the effect of the twisted bow.
Any way, the motor is now fitted, and as you can guess I'm now worrying over the rudder. It's a lot of strain on the rudder, and this amounts to a brass plate on a brass rod, passing through a sheet of cardboard. I'm going to have to think about how I do this, as I don't want to use any wood in the boat at all.
I've decided not to work on the superstructure until I can get the hull 100% finished. It shouldn't be too many weekends of work, now, until I get to the stage where I can fit the radio and controls (relatively easy task) and try it out on the lake.
Update - 29th August, 2005
It’s been a good bank holiday today. I managed to get some time on the boat. Gave it a sanding down, and managed to get a good coat of primer onto the hull. There are so many colours that show through when I sand it, that I need to put an even colour of primer on, to see where the flaws are. It’s not looking too bad. Two more sessions of filling, sanding, and all that good stuff, and it should be there. Started building the motor cradle today. Gone for a simple design. The motor has a gearbox, so there’s lots of torque, but slower spinning prop. Should cut down the spin force applied to the motor (and hopefully the cradle won’t get ripped apart).